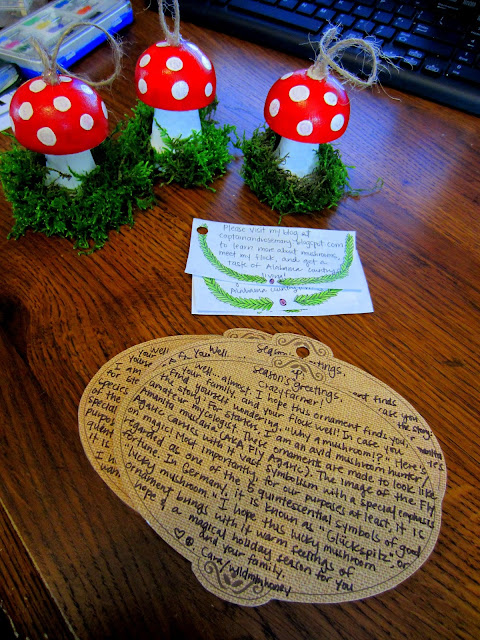
Constructing the ornaments was pretty straightforward. I pulled from ideas I saw on Pinterest and Martha Stewart Living (total Martha fan girl, right here) and the following is what I came up with! All it took was a trip to the craft store and a couple (fun) hours of my time. I made three because that's what I signed up for on the swap, so depending on the number you intend to make, you made need greater or fewer supplies.
I strongly recommend you read the tutorial all the way through before purchasing your supplies and sitting down to make your ornaments. You may need to customize the process to suit your needs.
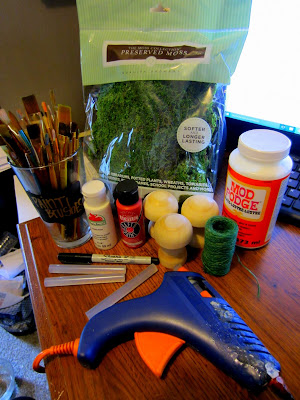
Here's what you need:
- Mushroom-shaped wooden blocks (I found mine by the woodworking items at Hobby Lobby.)
- Acrylic craft paint (I used white for the stem and dots, and red for the cap to make it look like a Fly Agaric, but you can use whatever colors you'd like!)
- Bagged craft moss (Can be found by floral supplies and wreath bases at craft stores.)
- Hot glue gun (For attaching moss and hanger to the ornament.)
- Paint brushes (For painting the ornament and applying the optional gloss sealer.)
- Jute or hemp twine (For the hanger.)
- Craft scissors
- Paper towels and/or old newspaper (To cover your work surface and clean up inevitable messes.)
- OPTIONAL: Black fine point Sharpie (For drawing the gills or pores on under the cap-- it adds a nice detail if you are going for more realistic-looking mushrooms.)
- OPTIONAL: Modge Podge or other glossy craft sealer (I think adding a gloss sealer to the cap after the paint dries makes it a lot more eye-catching! It'll catch light better from your stringed Christmas lights on your tree, too.)
- OPTIONAL: Sequins, craft gems, glitter or other fun embellishments for your mushroom cap.
Now that you have your supplies, here's how you put it all together!:
Peel any stickers off the mushroom-shaped block(s) and give them a rub down with a paper towel to make sure you don't have any dust left on them from the manufacturing process. This will make sure your paint goes on smoothly and won't chip or peel in the future.
Next, I gave my mushroom blocks a good base coat of white paint. If you chose a different color for the stem, you could just use that for the base coat instead of white. Make sure you cover the wood completely, from top to bottom. Painting with the grain of the wood makes it look tidier.
Let them dry completely, and then apply your cap color. Depending on the mushroom species you are modeling your ornaments after, you may or may not choose to paint the underside of the cap. I left mine white.
After letting the cap dry, paint on your dots or add other fun cap embellishments. You could get super fancy and crafty here, adding sequins or gems instead of painted spots, for example. You could also cover the cap in glitter for something really blingy and funky. Use your imagination and make something that will suit the vibes of your Christmas decor, or the tastes of your gift recipients.
Let your dots and/or embellishments dry completely, and then using your fine point Sharpie, draw your gills on to the underside of the cap You could also draw little dots or circles, for a bolete or polypore mushroom!
Next, you need to get your glue gun all heated up, and it's time break into that bag of pretty green moss. Tear off strips, shreds, or little patches from the moss--enough that you can hot glue the pieces all the way around the base of the mushroom. (Why yes, this glue gun IS from the early 90s. Thanks for noticing--it's been through a lot. Hahahha.)
Apply a ring of hot glue around the bottom of the stem part of your mushroom, and press your moss into the glue, taking care not to burn your fingers. (Note: If you are doing this craft with your little ones, please handle the gluing part for them.)
After attaching the moss and letting the glue set and dry, I applied a thin coat of the glossy Modge Podge to the cap. I realize I did this a bit out of order. If you want to use a sealer or gloss coating, I would suggest doing it after you paint on your cap color and dots, and before you glue on any embellishments and the moss. Doing it earlier in the process will also prevent you from having to unplug your glue gun to paint on the Modge Podge and let it dry, and then heating it back up afterward to attach your hanger. Sorry if this caused any confusion! That's why I recommend reading the tutorial all the way through before sitting down to make your ornament.
Let your Modge Podge or sealer dry all the way (I like to give it a good 12-24 hrs to make sure it's completely dry). Now, cut one 5"-6" length per ornament of your jute or hemp twine to use as your hangers. Using your glue gun, apply a bead of glue to the top center of your mushroom cap. Loop your twine piece over, making sure the ends are even, and stick them into the dot of glue. Hold the twine in place for a few moments to let the glue set up a bit. To make the hanger extra secure, apply an extra dab of glue on top of where you placed the ends of the twine.
After the glue attaching your hangers gets good and dry, your ornaments are officially FINISHED! Aren't they the coolest!?
Since I gave mine as gifts, I included a little note with the package, explaining the significance and symbolism of the Amanita muscaria, along with a well wish for this holiday season, and a shameless little promotion for my blog. ;)
Happy crafting!
Much love,
Cara


No comments:
Post a Comment